Thursday, February 26, 2015

Throwback Thurdsday - Totoro Time!

The last weekend of my short winter break surprised me with beautiful, warm weather. Unfortunately since Tuesday skies are grey, light is dim and air feels damp. And there's this unpleasant cold wind that freezes your very soul. I've had it with this winter!!!

Today was a long day, with classes in another city. I spend most of it poking a drop of blood mixed with reagent to see if anything happens. It was still somewhat exciting though! :)
Looking for something to cheer me up I stumbled upon one of my favourite projects:

The Blue Totoro! made from pattern by Sharon Ojala, which can be found HERE


I made this sweet little guy in June 2013 shortly after watching "My neighbor Totoro". I loved it so much! I made a special photo session in my garden. Here's Totoro sitting on an old apple tree:


And here you can see a happy meeting with two ladybugs:


During May and June 2013 I also watched a couple of other Studio Ghibli movies with my husband (who was still my fiance then). When I decorated our bedroom last summer I decided to paint the wall behind our bed:


I only had colors that were previously used somewhere around the house: pea-green, wheat-yellow, white, and two shades of brown. And also my trustworthy black acrylic paint. 


There are some Susuwatari hidden behind my dresser! But they're extremely shy.
 
Oh, and here's my tablet cosy with Totoro applique and flower-shaped wooden buttons. I'm not sure why, but my camera can't focus on the ornament, no matter what I do:


I hope I made your day at least a bit brighter,
Have a nice evening!

Gosia.

Friday, February 20, 2015

“True friends stab you in the front.”

I am aware that Throwback Thursday is already gone, but still:

Probably the majority of crafters went through a phase called "friendship bracelets". Some of us made simple striped ones, some mastered wide, colorful, tremendously complicated patterns. As for me, I was somewhere between, but still closer to stripes than 12-colored celtic ornaments.

I stopped wearing my bracelets some time after joining med school. Wearing pieces of cotton jewelery that you cannot take off and/or wash it's not a good idea when you visit multiple hospitals.
My husband however, with his MA in English Philology didn't face such epidemiological issues. I am obliged to make him a new bracelet each time the old one brakes.

Two days ago his striped blue bracelet ripped, at least that's what he told me. OK, no problem. I picked more complicated pattern with silverish diamonds on black background (pattern here).


I regretted it almost immediately, but as those of you who made at least one bracelet probably know... Frogging is not an option here. So I contiunued slowly, plucking my own hair from between the knots, and muttering all known cursewords.
Today I looked for the old one to compare length and that's when I discovered the damage:

Devastating!

This, my fellow crafters, is a bracelet broken beyond repair. At least according to my husband. 

What did he have to say in his defense?
"Oh, come on! It was a bit dirty! And now I can have two!"

Sure honey, sure you can. 
<goes back to knot tying and cursing>

Have a nice afternoon! 

Gosia

Wednesday, February 18, 2015

Phase Two of Cabling Initiated.

Yay! Finished the central part of my Cabled Bolster.


Here's the first part of the pattern:

NOTE: First and last stitch are edge stitches. I use the technique my Grandma taught me. First stitch is always slipped to the right-hand needle and last is always knitted. Both on right and wrong side.
This creates a neat edge with series of bumps and bars. Like this:


Whatever technique you use,keep in mind that you will be picking up stitches from this edge later on. Just don't make it harder than it is :)

CO34  using provisional cast on (32 sts + 2 edge sts - those will NOT be mentioned in directions)

Row1: *p2, k4* 5 times, p2
Row 2, and every even row: *k2, p4* 5 times, k2
Row 3: *p2, cross2L, p2, k4* 2 times, p2, cross2L, p2
Row 4: repeat Row 2.

Continue until desired length. End with Row 2.
Graft using kitchener stitch of three needle bind off.

That's pretty much it for the first part of the pattern. Time for some commentary:

About grafting... Since I'm not good at kitchener stitch, not to mention kitchener stitch for ribbing, I decided to use three needles bind off. To make it clear: I'm not proud of the outcome, the 1 stitch jog is clearly visible, and overall effect is messy... but every cushion has to lie on a bed of sofa, right? This means it has to have a bottom side!

Shame, shame, shame...
I picked up stitches with right side facing me, starting with the last stitch that remained from binding off. At first I picked one stitch from under each bump and bar, but it came close to 120 and that was definitely too much.
So I picked stitches like this: *bar, bump, bar, skip one bump,* four times and than bar, bump, bar, BUMP, and again  *bar, bump,.. and so on.
It resulted in 100 sts. I decided to make a ribbed (2x2) edges, narrowing towards ends. I still have to come up with some kind of fastener, because I want to be able to wash it once in a while.

Here's a look of how much work I still have left to do:


I have lots of free time this week, but in fact I'm really busy. For example I was going to make some serious progress on the Cables Project today but in the meantime I was asked to make a friendship bracelet for my husband, because his previous one broke. I think he has some kind of bracelet addiction :)

Have a nice afternoon!

Gosia.

Saturday, February 14, 2015

2 Shades of Pink.

I don't celebrate Valentines Day. In fact, I never did.  This year's commotion around "50 Shades of Grey" premiere is slowly starting to get on my nerves. I know some people may enjoy it, I really understand that. But the advertising campaign got so aggressive lately, I'm afraid to open my fridge. It's literally EVERYWHERE!
As a protest I started to work on a project I temporarily titled "2 Shades of Pink". I already know I will end up forgging it and starting over, because it came out stiff and unpleasant, but i find the overall design quite nice.


It's supposed to be an arm warmer with corrugated ribbing and stripey colorwork. I didn't take into account that the back layer of crossing strands will make the fabric so dense. 
What surprised me was that I am able to make the wrong side look so... neat. 

Neato!

What did the trick? Two-handed stranded colorwork! I never tried it before and it took me about 70km by a train to tackle it and finally:

Pics by my helpful husband. Thank you!

I am going to start it over right away with at least 5mm needles, or even more (4 mm just isn't enough). This means adjusting the number of initial stitches, and maybe some minor improvements to the design. 

I am having second thoughts about the corrugated ribbing. It looks cool, but it doesn't feel like ribbing at all! It's not flexible, and purls seem to be pushed forward by the "floats" on the backside. I must admit though, the texture is interesting. Maybe next time I will manage to knit it more loosely. 


That's all about my new project!
Time to go and undo my several hours of hard work. Yaaay!

There's also a bonus picture. A flock of sparrows! They visit my garden regularly  tweeting, fighting, bathing in every puddle and doing all kinds of sparrowy things.


Have a nice evening! 
And happy Valentines Day, for those of you who celebrate it!

Gosia.

Friday, February 13, 2015

Winter brake, computer meltdown and baloons!

I passed all my exams and finally have some free time!

My progress on Cabled Bolster is rather slow, but steady. I am 10cm away from grafting the centrepiece into a tube. I also started experimenting with corrugated rib stitch with my pink leftovers. I should call it "2 shades of pink", since counting color's shades got so popular lately...

Unfortunately, my almost 5yo laptop showed some bizarre behaviour yesterday and I had to wipe it clean. Now I struggle with restoring my previous software. I won't be able to share my pics until I get my hardware up and running :(

And one more thing (that I'm super proud of). I learned how to make balloon animals! OK, maybe using plural here is an exaggeration, but I know how to make a dog, a dachshund and a giraffe, which is also a dog, but with longer neck.
It's all thanks to my friend who invited me to a fun and games event organised by her parish. They invite all local children and arrange competitions and different activities.  
Here's the outcome of our hard work:


That's all for now. Keep your fingers crossed for the well-being of my poor old computer!
Have a nice afternoon!

Gosia.

Saturday, February 7, 2015

Mysterious Pink Thing is...

... no longer mysterious!

<drum roll>

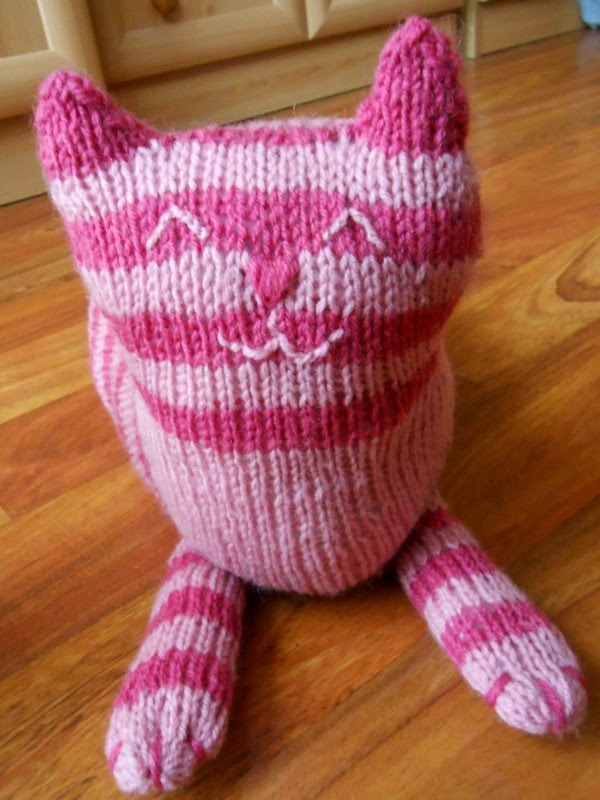
Ladies & Gentleman... The Huge Pink Cat:


It's a birthday present for my little niece. She turned one this week! :)

Some basic info:

  • It took me a little more than 2 weeks to finish.
  • Yarn is a 40% wool and 60% acryl mix "Czterdziestka" by Arelan. It's a Polish yarn I purchased in my favourite local yarn shop in Katowice. Very pleasant to work with although you can feel the acrylic fiber very clearly. I think it's suitable for decorative items rather than sweaters, but I am planing to make something wearable from leftovers.
  • Made with 4mm circular needles with Magic Loop Technique.
  • I used approx 100g of the yarn - 300 meters (328 yards). That's 1/2 of each of two skeins I bought.
  • It's filled with fiberfill from nearly one pillow.
  • Before embroidering and filling I gently steam blocked it.
  • Eves, snout and mouth are embroidered. I just don't trust safety eyes when it comes to toys for small kids. Also, for some reason safety eyes are hard to come by in Poland. 
  • I found many suggestions from other ravelers who made this cat, that's probably best to start with provisional cast on. I did. And that's definitely a good idea! 
  • I also tried to make my stripes jogless, that was a partial success as you can see:

I had a hard time with the neck shaping, but fellow ravelers were helpful as always. If you ever make this cat just follow the instructions step by step. It seems for a while that it's asymmetrical but the outcome is perfect! 
It's shape is very realistic. My brave cocker spaniel was so frightened, that he wouldn't want to be anywhere near it. Oh yes. he chases real cats around our garden. But he is never close to catching one.
Sewing on paws was tricky and they still are floppy when I pick up the cat, but I didn't want to ruin the chest shape by attaching them too far from the base.


Paws are also shaped a little differently than in original pattern.
And here's paw close-up:

High five!

I never had my own cat but it's my twelfth knitted/crocheted one! (One Jiji the Cat, 3 Retro Kittens, 2 Butt Cats, 4 Micro Kitties, 1 Garrus the Cat and this Huge Pink Cat). Does this make me a crazy cat lady?

Have a nice evening!

Gosia.

Friday, February 6, 2015

Cables onwards!

My work on the bolster coushion cover  progresses slowly but steadily. It's a bit too narrow but it was ment to be only a centerpiece anyway. When it's done I will graft both ends together and pick up side stitches to continue towards endings.
Yeah, and I just now realised that my cables will be horizontal not vertical after that... I guess I'll just change project's name.

Here's Hasiok helping to present my progress:


I really like how texture is so prominent with this yarn! You can see every single loose stich! That, of course, I do not like.

It seems someone is hoping for a new blanket:


Have a nice afternoon!

Gosia.

EDIT! Ohohoh! I almost forgot! Tomorrow night the Mysterious Pink Thing shall be shown to the world! Rejoice!

Thursday, February 5, 2015

Throwback Thursday: The Tale of Lost Alpacas

Throwback Thursday! I'm waiting for my exam results so I need to keep my mind busy... Here's the story of my  Fourteen Alpacas Pullover. It was based on this Drops pattern - "Autumn Flurries"


Long long time ago, in December 2012, just when the world was about to end (again).. my sister called to ask me what did I want for Christmas?

What could I say? Yarn of course! Drops Lima, one of my favourites.

We agreed that she will purchase 8 skeins of the main colorway and I will top it up with 1 skein of natural white & 2 skeins of moss green. Drops just had a big alpaca yarns sale (what an unforeseen coincidence!) and online yarn shops were low in stock. I ordered my part from another supplier  and got it just after New Year. My sister's part however hasn't arrived.

And here starts the fun part:

She emailed the shop and found out that she already accepted the delivery... in Warsaw. Over 330km from our home town. What happened? While she was filling in a form, another Anna X. also filled hers. Two different purchase orders were recorded within less than a minute. Shop workers somehow overlooked the fact that email addresses didn't match and contacted my sisters double to ask if she wanted both of packages sent together. She did. Well, who wouldn't accept it?

It took my sister a while to explain that she not only didn't get the yarn, but hasn't even been to Warsaw lately. It all turned out well eventually, as my alpacas arrived on January 12th,

Arrival of the Alpacas, forgive my shaky hands :)

You can find my work diary on Ravelry. It took me a month to finish it. I made also some modifications. I started with provisional cast on around waist and continued up, and came up with my own yoke design. Here's the chart:


And 16x16 square version:

It has it's own pattern page on Ravelry.

Sadly, I don't wear my pullover too often because it's too warm. Maybe this years winter will change that!

Have a nice afternoon!

Gosia.

Tuesday, February 3, 2015

Slanting Cables Gone Wrong.

Winter just got very winterish all of a sudden. Tempertures stay below 0°C for most of the day and it snows every now and then. I found a little snowy heart under my window!


I came up with this form my bolster coushion cover:

Circumference 54cm
CO 64 st with provisional CO
Row1: * row always starts here: k2 p2 k4 p2 k24 p2 k4 p2 k22
Row2: k2 M1L p2 k4 p2 SSK k23 M1L p2 k4 p2 SSK k21 adjust row marker position
Row3: knit knits purl purls
Row4: k2 M1L p2 cross2L p2 SSK k23 M1L p2 k4 p2 SSK k21 adjust row marker position


 And I was happy about it... untill I realised that it was:

  • too big - I based my calculations on an old (and currently nonexistent) swatch.
  • weirdly shaped - that's what you get when you mess with the row marker
  • asymmetrical on sides - SSK isn't the neatest decrease.
That's how I abandoned my Slanting Cables Plan, and now I have a Vertical Cables Plan going on.
It wasn't easy to pick one version of it either:


I decided to go with three cables separated by two plain stripes. It's the last one sketched. 

Have a nice afternoon! 

PS.: Don't you just LOVE winter sky? I certainly do!