Showing posts with label Escherichia's Designs. Show all posts

Saturday, December 19, 2015

...Star Wars all the way!

Just a quick post today.
We went to see new Star Wars yesterday. My hubby in his All-Terrain Awesome Tank and me holding our very own...

...BB-8!


I made this sweetest of droids almost a month ago. It is improvised from top to bottom and I'm not really planning on releasing the pattern.

Antennas are made from pipe cleaners and I trimmed the fluff excess :)


That's all for today because I'm busy with Christmas preparations. Today I'm making pierogi for my family.

Have a nice afternoon!

and (of course)

May the Force be with you!

Thursday, December 10, 2015

Box-o-Gnomes.

Time goes by so quickly when you have an "adult life"! Work-home-work-home... And just like that first part of my internship just comes to an end! I wanted to give my coworkers a nice goodbye present, which happens to also be a Christmas gift.

Since I needed something to work up quickly I thought of...

A Box-o-Gomes!

As you can see I took time to give each gnome an original outfit and different mustache/beard style.


How to make your own Box-o-Gnomes?
\
You'll need:

  • Yarn: I used Yarnart Etamin (sold in skeins of 30g): red, beige, green and grey - 1 skein of each color should be plenty for at least 12-18 gnomes.
  • Crochet hook: I used a 3mm one, my gnomes are 6cm/2,5inch tall. Use a hook that fits your yarn.
  • Stuffing material: I prefer using polyacrylic filling from pillows.
  • Black acrylic paint/safety eyes/black beads
  • Small scraps of grey felt.
  • ... and a box.

Gauge is not important.
Do not join rounds.
Numbers in brackets () indicate number of stitches after each round.
Abbreviations are in US crochet terms.

sc - single crochet
hdc - half-double crochet
inc - increase = sc2 into next sc
dec - decrease, I strongly recommend using invisible decrease!
BLO - working in back loops only

HAT (with red yarn):
1) sc 6 into magic loop
2) sc 6
3) *inc, sc* around (9)
4-5) sc 9
6) *inc, sc 2* around (12)
7-8) sc 12
9) *inc, sc 2* around (16)
10-11) sc 16


HEAD (beige yarn)
12) sc 16 - back loops only
13) sc 16
14) sc 7, popcorn st* into next sc, sc8
15) sc 16

*popcorn stitch - make 5 hdcs into next stitch, pull hook out, put hook through the first of 5 hdcs and drag the working loop through.

BODY (alternating between green and grey yarn)
16) *inc,sc7* around (18)
17) sc 18
18) *inc, sc2* around (24)
19) sc 24
20) *inc, sc3* around (30)
21-22) sc 30
23) *dec, sc3* around (24)
24) *dec, sc2* around (18)
25) *dec, sc* around (12)
26) *dec* around (6)

Fasten off  and sew remaining hole.


Paint on, embroider or sew on eyes.

Totally professional painter's kit.

Cut out a desired mustache/beard shape from grey felt. Sew on just below the nose.

Hulk Hogan & hipster!

© Copyright M. Machowska - Escherichia,  December 2015 
© Copyright for pattern remains with the designer. Intended for personal use only. Not for commercial use.
Please do not sell items made with this pattern. Unless it's for charity – feel free to do that :)

Pdf available on Ravelry: here.


Have fun creating you own gnome army!
And a nice afternoon!
Gosia.

Friday, October 30, 2015

World's Best Dachshund!

Exactly eight years ago we said goodbye to our family dachshund - Dino.


Just let me tell you: he was an exceptional dog! Smart, independent, always hungry and even more independent. Despite being pretty much earthbound, Dino had no problems with getting on a table top and eating WHOLE cup of sugar. Or levitating to get some leftovers:


Some say that dog lovers can be divided into two groups: dachshund fans and others.
That's probably the main reason why dachsie patterns are so popular on Ravelry.
I run into several, but none of them included any chest-shaping and they reminded me of walking sausages :)

This particular plushie was designed for my flatmate, to resemble her neurotic dachshund "Claw".

Dachshund "Claw"


Gauge: is not important.
Size: using 3,25mm hook gave me about 4inch long dachshund
Abbreviations (in US crochet terms):
sc - single crochet
hdc - half-double crochet
dc - double crochet
sl st - slip stitch
ch - chain
Numbers in  brackets () indicate the number of stitches you should have after finishing each round.
DO NOT JOIN ROUNDS!

Body&Tail:  

Rnd1: sc 6 into a Magic Loop, (6)
Rnd2: 2sc in each sc, (12)
Rnd3:  hdc, 2hdc in next 2sc, hdc, sc till end (14)
Rnd4-5: sc even (14)
Rnd6: sc, sc2tog, sc2tog, sc till end (12)
Rnd7-13: work sc  (12)          you can adjust your dog length by adding or subtracting rows
Rnd14: *sc in next 3 sc, 2sc in next sc* repeat 3 times (15)
Rnd15: sc even
Rnd16: *sc in next sc, sc2tog* repeat 5 times (10)
Rnd17: sc even (10) Stuff your toy:)
Rnd18: sc2tog around (5)
Rnd19: fold and sc 2 across remaining sts to close the hole (2)

Tail: 

continue work ch9, slst into every ch. and into sts from Rnd19, fasten off,

Head: 

*Rnd1: sc 6 into a Magic Loop, (6)
Rnd2: *sc in next 2 sc, 2sc in next sc* repeat twice (8)
Rnd3-4: sc even (8) -  if you want a longer snout, add rows here:)
Rnd5: sc and hdc into next sc, hdc and dc into next sc, dc and hdc into next sc, hdc and sc into next sc, sc into last 4 sc (12)
Rnd6-7: sc even (12)
Rnd8: *sc, sc2tog* repeat four times (8)
Stuff now!
Rnd9: sc2tog around (4) Fasten off, sew remaining hole.

Ears - make 2: 

Rnd1: sc4 into Magic Loop
Rnd2: 2sc in each sc (8)
Rnd3: sc even (8)
Rnd4: *sc into next 2 sc, sc2tog* twice (6)
Rnd5: sc even (6) Slst into first st. Fasten off.
Do not stuff, just flatten and sew them on.

Legs - make 4: 

*Rnd1: sc6 into Magic Loop
Rnd2-3: sc even (6) - again length adjustment can be made here:)
Fasten off leaving long tail for sewing.

Sew parts together, make sure that the chest part (shaped with hdcs ind rnd 3 of body) is facing down! Unless you wish to have a hump-backed dachshund:)

If you wish to make a "black-and-tan" version of a dog you should make those rounds with tan yarn. You can also embroider eyebrows, chest-markings and ear edges:) Enjoy!


© Copyright remains with the designer. All rights reserved. Intended for personal use only. Not for commercial use. Selling items made from this pattern is not permitted.
© Copyright M. Machowska - Escherichia, October 2012


PDF for the pattern is available here. Check out other ravelers creations - they are so cute!
I hope you'll enjoy it! 

Have a nice afternoon!

Gosia.

Thursday, September 24, 2015

Parasite plushies #1

Few days ago I got an uncommon request. To be honest, it was the most bizzare request ever.
"Can you crochet a medicinal leech for me?"
I felt flattered! It feels good to be the person to turn to when you need a weird plushie! :)

I got down to designing said leech. I was wondering how to create a nice little sucker... and an old design popped into my head. Let's spend a nice Throwback Thursday, shall we? With a Tapeworm Bookmark!


I never shared it on the blog before. It was a gift for one of my classmates (and friends). He asked for a bookmark. And since we shared a table during our parasitology classes, and worked together on unforgettable drawings depicting countless  tapeworms, pinworms and fleas ... choice was obvious!

Here it is:

Tapeworm Bookmark

Bored? Make yourself a useful toy! Show your kids why should they wash their hands before each meal, and never eat raw meat of unknown origin!

Gauge: is not important.
Abbreviations (in US crochet terms):
sc - single crochet
dc - double crochet
sl st - slip stitch
ch - chain
FLO - front loops only
BLO - back loops only
Numbers in brackets () indicate the number of stitches you should have after finishing each round. If you wish, you can join rounds but it's not necessary (I didn't do it:))


Head (scolex): 
Rnd1: 6sc into Magic Loop
Rnd2: 6 sc in FLO
Rnd3: 2sc in each sc across (12)
Rnd4: sc even in BLO (12)
Rnd5: *sc in next sc, sc2tog* repeat 4 times (8)
Rnd6: sc even (8)
Rnd7: *2 sc in next sc, sc in next sc* 4 times (12) in FLO!
Rnd8: *sc in next sc, 2 sc in next sc* 6 times (18)
Rnds 9-10: sc even (18)
Rnd11: *sc in next sc, sc2tog* 6 times (12)
Rnd12: sc2tog across (6) Stuff head, make sure you do it lightly so the sucker stays concave in the middle!
Rnd13: Fold and sc 3 across remaining st (3)

Suckers (make 4)*: sc 6 into magic loop, sl st into 1st sc. fasten off, sew on sides of head,

*version for ultra-lazy people: sew on 4 buttons:)

Now you will continue work flat. From this point length, shape, anything is entirely up to you. You decide how many segments do you want to make. Here are some general instructions:

Neck:
ch1(counts as sc)  sc 2, turn
ch1,  sc 2, turn
ch1, 2 sc in next sc, sc, turn (4)
ch1, sc, 2 sc in next sc, sc, turn (5)
sc even 3-4 rows

Small segment (I made about 4 of those in the beginning and 3 near end)
ch3 (counts as dc) dc in each sc, turn (5)
ch1, sc in each dc (5)

Big segment:
ch3,  *2dc in next sc, dc* twice (7) turn
ch3, *dc2tog, dc* twice (5)
ch1 sc in each dc

Green - big segment
Red - small segment


"Tail"
Just to be clear: a tapeworm shouldn't narrow towards the end!
But to make it look nicer... just reverse the neck instructions:) and sc2tog in the end to get a nice pointy ending.

Finished!

Feel free to experiment with colours, I would love to see this multicoloured!

© Copyright remains with the designer. All rights reserved. Intended for personal use only. Not for commercial use.  © Copyright M. Machowska - Escherichia, January 2013

PDF available on Ravelry (also in Polish!): here

Crocheting your own tapeworm shouldn't take you more than one afternoon, unless of course you are going for a life-sized Taenia solium... 2 - 3 meters can be more challenging.

Hope you liked it!
Next time I will be sharing with you my cuddly leeches. I'm in the middle of the third draft version.

Have a nice afternoon!

Gosia.

Friday, September 4, 2015

All-Terrain Awesome-Tank!

Star Wars project is ready!


It took me 20 days (from second cast on) to finish.
I don't like the see-through effect around AT-AT's. I think it's because I used needles bigger than recommended. On the other hand - doesn't it look exactly like falling snow? :)


I am 104 days ahead of my schedule! So I started knitting a cardi for myself. It's in rather thick, creamy acrylic.
We're leaving this afternoon for our weekend to the land where the crow flies backwards. Please, don't tell my hubby half of my backpack is packed with yarn!  


Until next week! 

Have a nice afternoon!

Gosia.

Tuesday, August 25, 2015

Star Wars Project almost done? Bracelets time!

Frogging first version of All-Terrain Awesome-Tank was the one of my best knitting-related decisions. Completing new front design took me less than a week. And, I have to admit,  it fills my heart with pride:


Although backside is plain, work progresses slower. I guess lack of challenge makes the work a bit boring. However, I'm pretty sure I'll finish the work before the Episode 7 is out. 


Last week I made a little side project. Well.. at least I wanted it to be just a side project. 
It was Mom's birthday so I waned to finally crochet a beaded bracelet I promised her a while ago. 

So I took out my Toho (11/0) beads, 1mm crochet hook, a magnetic clasp and some cotton thread...


Spent long time playing with DB-Bead pattern generator...


And voilà!


This could be the end of this story, but I did something stupid. I posted a photo on Sockalong Society knit n natter group... There were of course lots of nice comments, including one mentioning a different bracelet making technique. And just like that I got introduced to Kumihimo.

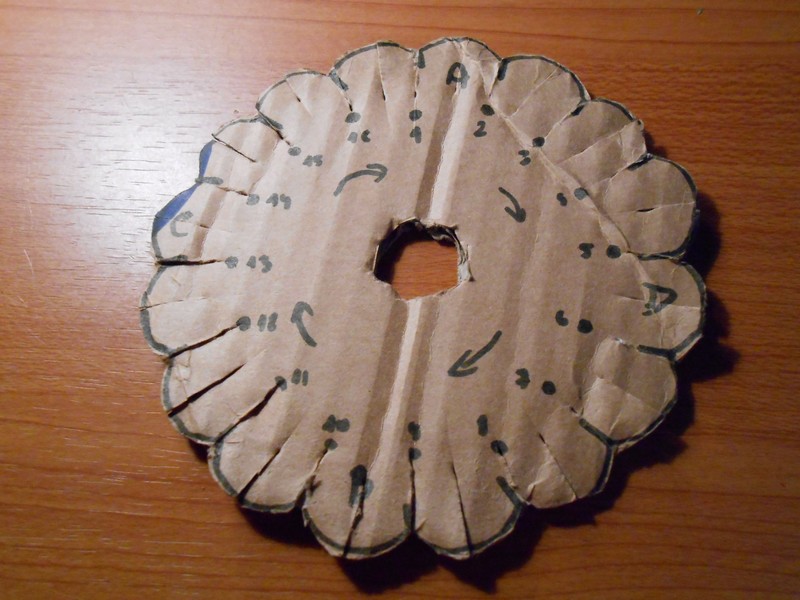
I carved my first disk out of a piece of cardboard. It bends and is far from professional, but it works!


To this point (since yesterday) I made three bracelets, and ordered a real Kumihimo disk. I'm afraid it got me!


That's all for today! It's time to get a cup of coffee and pore over a book a little.

Have a nice afternoon!

PS.: It finally RAINS!!!


Monday, June 29, 2015

Latest creation: Serration!

Ladies and gentleman! After a long, sometimes dull process of designing, knitting, writing pattern, taking pictures, convincing husband that photographing my both hands at once is impossible without his help...
I'm proud to present, an all new pattern:


<drum roll>

Serration 

Fingerless Mittens


Gauge: 30sts/10cm with 2,5 dpns stockinette in round
I don't measure my vertical gauge. Just try your mitten from time to time to see if it still fits.
MC-Main Color
CC – Contrast Color
M1R – make one right = right slanting increase
M1L – make one left = left slanting increase
PM – Place Marker


CO 52sts (using MC) 

Rows 1-30 - Cuff:
while kitting k2p2 – divide into 3 (18-16-18) or 4 needles (13 each)


k2p2 for 30 rows in total (or for desired length if you want longer cuffs)

Rows 31-40:
k all stitches

Row 41:
k3 M1R k1 PM k to last 4 sts, PM, k1 M1L k3

First marker placed

Row 42:
k all stitches

Rows 43-52:
Odd rows: k until there's one st left before marker, M1R, k1, slip marker, knit to next marker, slip marker, k1, M1L, k to end of round
Even rows: k all sts
You should now have 64 sts divided into thumb section (20) and palm section (44)

Rows 53-58:
Knit chart A

Dot indicates where to begin


Place last 10 sts on a separate dpn while knitting the last row

Row 59:
k7 sts with 1st dpn, k next 3 sts with 2nd dpn along with 3 sts of the dpn that contains last 20 sts of the row. Knit last 7 sts with 3rd dpn.

You can get rid of the markers at this point. Also you might consider moving unused stitches to a piece of scrap yarn or a circular needle. Unless you are comfortable with working with 7 dpns at once :)


Thumb

With CC
Rows 60-62:
k all stitches

Rows 63-66:
k1 p1 I recommend using twisted rib stitch!
bind off

Palm

With CC
Row 60:
k dividing into 3 needles (16-16-12), pick up 4 sts from side of your thumb gusset. You may need to sew some holes later. (48)


Red dots are the stitches from thumb section I used for picking up 4 sts mentioned in row 60. Picture on the right shows stitches picked up from one (red) and the other (yellow) side of the thumb,

Rows 61-69:
k all stitches

Rows 70-75:
Knit chart B

Dot indicates where to begin

Here's how the finished colorwork looks like: 


Rows 76-83:
k1 p1 (again – twisted rib stitch looks better)
bind off

Repeat rows 1-83 to create a second mitten. :-)


© Copyright M. Machowska - Escherichia, June 2015

© Copyright for pattern remains with the designer. Intended for personal use only.
Not for commercial use.

Selling items made from this pattern is not permitted.


Pattern pdf available on Ravelry: here.

I hope you enjoyed it! As opposed to Korek, who refused to take part in photo session.

"Go away. I've got some dog business to attend to."
Now I will have to make some progress on my husband's vest, or wait for another creativity wave.
Have a nice afternoon!

Gosia.

Sunday, May 17, 2015

The Star Wars Project!

There are only 214 days left until Star Wars episode VII! 
How do I know?
There's an online countdown.

My husband is a die-hard Star Wars fan. He also doesn't like when I knit/crochet and watch movies at the same time. I decided to make him something that will stop him from complaining about me knitting "all the time".
He promised he will wear it for the premiere! Can't wait!
I present to you the All-Terrain Awesome-Tank!


Which is a vest really, but "tank" fits the title better :)

I came up with the idea of joining traditional Norwegian ornaments with AT-ATs and Tie Fighters about a month ago. It took me quite a time to plan it. 


I just finished the bottom part and got to a bit boring, plain middle section. Due to my dangerously near finals I work mostly during my train trips. I'm using an acrylic-wool mix. Maybe not top notch quality, but it's pleasant to work with.


I will probably do some embroidery work to enhance the look of Tie Interceptors. Yes, yes those are interceptors not fighters because they have curved wings. As a geek's wife you just have to know... things.


As for my Sockalong adventure: it continues! I'm now a proud member of the Winwick Mum Sockalong Society and my green socks  photo is a part of the official banner!
My yarn stash got a bit bigger (again), and I'm working on second pair of socks. This time for my husband, of course.
Yesterday we had a small family grill party outside. What can be better than late afternoon with knitting and great food? 


Have a nice afternoon!

Gosia.


Sunday, March 29, 2015

Ugly but Snuggly... (Sn)uggly!

I discovered my main problem with knitting sweaters. I never wear them. Seriously. My Fourteen Alpacas Tunic is too warm, Autumn Mess pullover is cute, but leaves my undershirt all fuzzy...
My striped cardi is awesome, but the yoke is kind of stretched out...

So I thought about making a sweater that I WILL wear. Something to throw on myself when evenings are chilly. And I came up with an idea for the Ugly but Snuggly Sweater aka (Sn)uggly.


 Luckily I already have sufficient amount of yarn. I found it while renovating my attic bedroom. It's a 54%Acryl 46% PA bouclé mix made in Czech Republic. Since I cannot find it in Ravelry's database and I'm pretty sure it's been discontinued.


Once I even stated working on a big simple sweater then but I never finished even one part of it.
Funny thing about this yarn it's that it is extremely efficient. This piece was made in garter stitch from one 100g skein:

Hand for scale

Now I'm off to mindlessly knitting my first sleeve!
Have a nice evening!

Gosia.

Tuesday, March 17, 2015

Stampey the Teacup Pig

Awww maaaan, is it Tuesday already? How did that happen?!

Good news! I just finished my new free amigurumi pattern. This was a quick one! Meet Stampey the Teacup Pig!

There was a time I planned on keeping a teacup pig as a pet. Fortunately (for me as well as for the said creature) I met an ex-teacup pig owner. Why "ex-teacup"? Apparently 50kg (approx. 100 pounds) is a standart weight for an adult mini-swine. Even one that started as a tiny piglet. Sure, some may stay smaller, but I don't think I could take the risk. No teacup pig for me, I guess:(

Sounds familliar? Hey, you should get a pig that will literally fit into a teacup FOREVER!


Huge teacup on courtesy of my flatmate - Iza. Thank you!


Stampey the Teacup Pig


Materials:
I used about 20-30 grams of Sport weight yarn
4mm hook (or smaller, 3,5 mm would probably be better)
pillow's innards, or other stuffing material
scraps of yarn for embroidery.

Pattern uses US crochet terms! Do not join round, unless instructed to.

Body&Head:
ch2 (or make a Magic Loop)
Row1: sc6 into 2nd ch from hook (or into Magic Loop)
Row2: 2sc in each sc. (12)
Row3: *2sc in next sc, sc* around (18)
Row4: *2sc in next sc, sc2* around (24)
Row5-10: sc around (6 rounds)
Row11: sc2tog 4 times, sc16 (20)
Row12: sc around
Row13: sc2tog, sc2, sc2tog, (18)
Row14-17: sc around (4 rounds)
Row18: *2sc in next sc,  sc,* 3 times, sc3,  *2sc in next sc* 3 times, sc3 (24)
Row19-20 sc around (2 rounds)
Row21: sc, sc2tog 3 times, sc17 (21)
Row22: sc2tog, sc, sc2tog, sc8, sc2tog, sc6 (18)
Row23: sc6, sc2tog 3 times, sc6 (15)
Row24: *sc2tog, sc* round (10)
Row25: sc2tog around, fasten off.

Ears (2):
ch2
Row1: sc,hdc,dc,tc,dc,hdc,sc, slst - all into 2nd ch from hook
Row2: sc in first 3 sc, sc, ch sc into next st, sc in last 3 sc. slt st into sl st from previous row, fasten off.

Snout: 

NOTE: I seldom join the rounds, but this time I made an exception. Joined round do not create a visible jog. You can make a spiral snout but I recommend giving it a try.

ch2 (or make a Magic Loop)
Row1: sc6 into 2nd ch from hook (or into Magic Loop), sl st into 1st sc, ch1
Row2: 2sc in next sc around, sl st into 1st sc, ch1
Row3: BLO: sc in each sc, sl st into 1st sc, fasten off.

Sew the snout over the hole that was left in front of your pigs head. Stuff if necessary.

Front Legs (2):
ch2 (or make a Magic Loop)
Row1: sc6 into 2nd ch from hook (or into Magic Loop)
Row2-6: sc around
Row7: sc3, ch1 turn
Row8: sc3, fasten off

NOTE: rows 7&8 are meant to be incomplete.

Back Legs (2):
ch2 (or make a Magic Loop)
Row1: sc6 into 2nd ch from hook (or into Magic Loop)
Row2-6: sc around
Row7: sc, *2sc in next sc* 2 times, sc, ch1 turn
Row8: sc5, fasten off.

Tail:
ch10
2sc in each chain

NOTE: if you don't want your tail to be curly near the basis, just make single sc into last 2 ch or so.

Assemble & embroider as you wish.

Enjoy your teacup pig!

© Copyright for pattern remains with the designer. Intended for personal use only. Not for commercial use.Selling items made from this pattern is not permitted.© Copyright M. Machowska - Escherichia, March 2015


Pdf available on Ravelry: HERE


Why "Stampey"? The pig's owner I mendtioned refferd to her snout as a "stamp". It sounds even better in Polish - "pieczątka" :3

Have a nice afternoon!

Gosia.


Sunday, March 1, 2015

Cabled Bolster Finale!

It is still missing a cord to pull close the ends. I just got my hands on my long lost knitting dolly. It had a piece of my first work on it. Apparently, back in 2011 I was able to make a neat-looking cord. I guess human procedural memory isn't half as good as it's said to be.
Nevertheless I present to you:

My (almost) finished Cabled Bolster!

Pattern:

MATERIALS: 
approx 150g of Aran weight yarn (240m), in this case Schachenmayr Nomotta Cotton Light
two sets of 5mm circular knitting needles (that is if you want to work on both ends simultaneously.)
cable needle
one bolster cushion - I bought mine in Ikea, but removed the labels and can't remember the name :(

Part I - Centerpiece
This part is knitted flat, back and forth on circular needles. 

NOTE: First and last stitch are edge stitches. I use the technique my Grandma taught me. First stitch is always slipped to the right-hand needle and last is always knitted. Both on right and wrong side.
This creates a neat edge with series of bumps and bars. Like this:


Whatever technique you use,keep in mind that you will be picking up stitches from this edge later on. Just don't make it harder than it is :)

CO34  using provisional cast on (32 sts + 2 edge sts - those will NOT be mentioned in directions)

Row1: *p2, k4* 5 times, p2
Row 2, and every even row: *k2, p4* 5 times, k2
Row 3: *p2, cross2L, p2, k4* 2 times, p2, cross2L, p2
Row 4: repeat Row 2.

Continue until desired length. End with Row 2.
Graft using kitchener stitch or three needle bind off.

Part II - Tubes
this part is worked in round. I am a die-hard fan of magic loop technique, but if you're more comfortable with DPN's do not hesitate to use them.

Pick up the stitches from each edge. You should pick up stitches from beneath bars and bumps mentioned earlier. Number of stitches should be dividable by 4.
I got 100 sts by picking up as follows:
*bar, bump, bar, skip one bump,* four times and than bar, bump, bar, BUMP, and again  *bar, bump,.. and so on.

If your number of stitches is not dividable by 4 - don't worry! Just knit one round and add/take away some until you get it right.

Row 1-8: k2, p2 around
Row 9: k2tog, p2 around
Row 10-17: k1, p2 around
Row 18: k1, p2tog around
Row 19-26: k1, p1 around
Row 27: yo, k2tog, p1, k1 until last 2 sts, p1, k1.
Row 28: k all sts and yo
Row 29: p all sts
Bind off. I recommend using some kind of stretchy bind off. I used Jenny's surprisingly stretchy bind off - here's an article on it on knitty.com

HINT: Every bolster is a bit different, and I hate counting rows and making notes. That's why I used second set of needles and knitted a few rows of each side at a time.

Part III - The Cord
Make a nice cord with any technique you choose. If you don't like making cords you can always buy a fancy one in a store :)
Pull it through the holes made in Row 27.

Enjoy your new cabled bolster! Yaaay!

© Copyright for pattern remains with the designer. Intended for personal use only. Not for commercial use.
Selling items made from this pattern is not permitted.
© Copyright M. Machowska - Escherichia, March 2015

Pdf version on Ravlery HERE

Whew! I'm glad it's done. This yarn is quite pleasant to work with, but it splits from time to time. It drives me crazy when I find a loose thread sticking out from my work 5 rows below...

I finally went home for the weekend, and left grey, gloomy Katowice for few days. And while at home I found... Spring! Look for yourselves!

Crocuses (or is it "croci"?)

Snowdrops (or "Śnieżyczka przebiśnieg" in Polish :)

Of course I had to return for my next week of classes, but I went back with my inner batteries charged. And let's not forget about home-baked bread from my Mom and eggs from genuine country-side hens. Home, sweet home!

Have a nice evening!

Gosia.