Saturday, April 4, 2015

Easter

It's time for Easter eggs! Dyeing eggs in a "soup" made of onion's peelings is a common tradition in Poland. It gives them a rich, rusty color. The key to achieving a dark, even tint is degreasing eggs at first. I wash them with detergent, and then swab with 95% ethanol to get a dry, clean surface.
I also add few drops of vinegar to the mixture and cook it together for 10 minutes. 
Color can also be enhanced by greasing and polishing finished Easter eggs.

A year ago I found an interesting modification to that method. It involves different leaves (the more complex shape - the better) and old stockings/tights cut into pieces. I was a bit sceptical at first. We all now the bitter taste of failed Pinterest projects, don't we? But this is soooo great! 


I made those with my husband. I took us less than hour to complete it, including a trip to garden in a search of leaves.

My (Sn)uggly project has been suspended for the moment.
Why?
 Last Tuesday I got a message from my former classmate, who asked if I would like to "adopt" some yarn that she wouldn't need anymore. 


Best Easter Surprise Ever! 


Hasiok is also happy about it!


I got it all organised in my huge wicker basket and started working on my dream project! 

Ripple blanket!

 I adore all blankets made by Lucy from attic24 but the Neat Ripple pattern is my all-time favourite! 
Here are my small samples of all blue-ish yarns. They are different brands, but all of them 100% acrylic and in comparable weight.


I'm planning on making it approx 1x2 meters, so I can put it across my bed,over the pillows.  Oooh! Can't wait to get started! 

Have a nice afternoon! And Happy Easter!
Gosia.


Thursday, April 2, 2015

Bunnies & Chicks!

Easter is just around a corner. However judging by the weather I'm not really sure if it's Easter or Christmas...

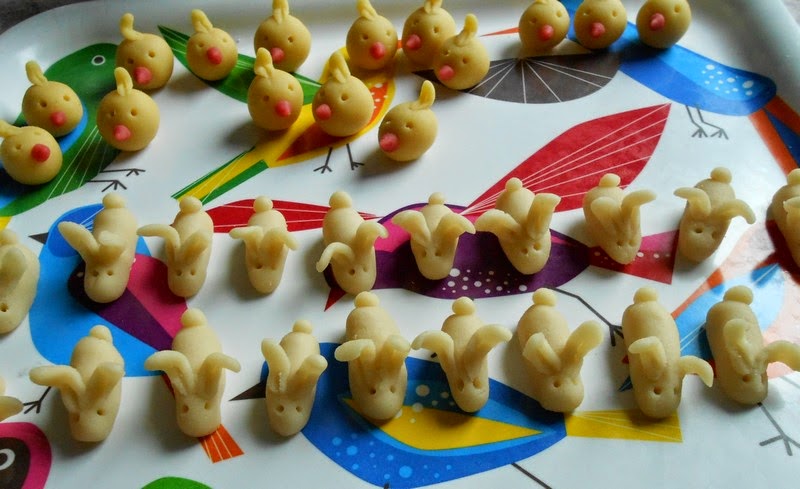
Aaanyway! Today I had a lot of fun with a marzipan bar & some food coloring.


 Believe it or not was my first time dyeing food! My mom was never fond of artificial sweeteners, dyes and flavors. I have to say at first I was a bit disappointed with the effect. I imagined that adding just few drops of it will make my marzipan bright yellow or red & so on (yeah, thank you Pinterest). Not really...

The overall effect is sweet, but I admit... I did let out a malediction or two while trying to mix it all properly.

Sooo...

I mixed 200g of marzipan with 50g of powdered sugar, and split it in half.
Here's a short photo-diary of my work:


Part I: Chicks!


Bigger ball is supposed to be yellow :) The red one could be smaller, I didn't use it all up.


And here are chicks basis! There were 15 of them. I split the big ball of dough into 16 smaller ones and left one for decorations.


Then I took small nubs from the leftover ball and created curled feathers for each chick's head.


Beaks are simple cones made from red dough. I didn't think they would hold... 


...but they did!


I don't like painting with those sugar markers so I made eyes by poking my chicks with a toothpick. Cruel, yet good-looking!

Pat II: Bunnies!


For bunnies I used undyed marzipan. Rolled it into small balls and then into cylindr-ish shapes.


Aaaand then I noticed that my camera is all sticky with sugar, and so I stopped documenting my work :(

Ears were made similarly to chick's feathers, but they're a bit longer. And tails were made from tiny marzipan balls. I attached them by poking it with a toothpick near the basis. That's kind of gross but effective... and somewhat anatomically correct :)

Tadaaaaaaah! 


Have a nice afternoon!

Gosia.


Sunday, March 29, 2015

Ugly but Snuggly... (Sn)uggly!

I discovered my main problem with knitting sweaters. I never wear them. Seriously. My Fourteen Alpacas Tunic is too warm, Autumn Mess pullover is cute, but leaves my undershirt all fuzzy...
My striped cardi is awesome, but the yoke is kind of stretched out...

So I thought about making a sweater that I WILL wear. Something to throw on myself when evenings are chilly. And I came up with an idea for the Ugly but Snuggly Sweater aka (Sn)uggly.


 Luckily I already have sufficient amount of yarn. I found it while renovating my attic bedroom. It's a 54%Acryl 46% PA bouclé mix made in Czech Republic. Since I cannot find it in Ravelry's database and I'm pretty sure it's been discontinued.


Once I even stated working on a big simple sweater then but I never finished even one part of it.
Funny thing about this yarn it's that it is extremely efficient. This piece was made in garter stitch from one 100g skein:

Hand for scale

Now I'm off to mindlessly knitting my first sleeve!
Have a nice evening!

Gosia.

Sunday, March 22, 2015

On Bees and Bunny-Drives

Spring gets nearer with every day, and it's time to start preparations for the new gardening season!

My Dad discovered mason bees back in 2012. He made his first "hive" in September, so a bit too late, but still some of the tunnels were occupied.  In spring 2013 we had already 4 beehives made from pieces of wood with 8mm holes.


Pretty neat, right?
This year, Dad decided to go pro:


Two empty compartments on sides of the brick, were later filled with natural clay. This one was made for my brother's garden, now another is being made for Mom's special order.

If you wonder how does a mason bee look like.. well capturing their image is really hard. They're smaller and faster than normal bees. This is the closest I got to taking a picture of a mason bee:


And there's always Wikipedia, right?

Now about my newest "invention"... The Bunny-Drive! 
Last Wednesday we went to look up Play Station 3 prizes in local shops. Those nice 8GB pen drives were on sale:

The problem is it is so tiny! So I thought of way to make it bigger, more... prominent and festive :)
Here's the Bunny-Drive!


There are 8 scs in first row, 6 in second (first and last were skipped) and ears are made on 8 chain basis, with sc in 2nd ch and hdcs all the way down. I embroidered the nose and drew eyes with a permanent marker.

Now I'm back to enjoin my Sunday evening with Assassin's Creed IV: Black Flag along with matching coconut&pineapple muffins.


Fair winds!
... and a nice evening :)

Gosia.

Tuesday, March 17, 2015

Stampey the Teacup Pig

Awww maaaan, is it Tuesday already? How did that happen?!

Good news! I just finished my new free amigurumi pattern. This was a quick one! Meet Stampey the Teacup Pig!

There was a time I planned on keeping a teacup pig as a pet. Fortunately (for me as well as for the said creature) I met an ex-teacup pig owner. Why "ex-teacup"? Apparently 50kg (approx. 100 pounds) is a standart weight for an adult mini-swine. Even one that started as a tiny piglet. Sure, some may stay smaller, but I don't think I could take the risk. No teacup pig for me, I guess:(

Sounds familliar? Hey, you should get a pig that will literally fit into a teacup FOREVER!


Huge teacup on courtesy of my flatmate - Iza. Thank you!


Stampey the Teacup Pig


Materials:
I used about 20-30 grams of Sport weight yarn
4mm hook (or smaller, 3,5 mm would probably be better)
pillow's innards, or other stuffing material
scraps of yarn for embroidery.

Pattern uses US crochet terms! Do not join round, unless instructed to.

Body&Head:
ch2 (or make a Magic Loop)
Row1: sc6 into 2nd ch from hook (or into Magic Loop)
Row2: 2sc in each sc. (12)
Row3: *2sc in next sc, sc* around (18)
Row4: *2sc in next sc, sc2* around (24)
Row5-10: sc around (6 rounds)
Row11: sc2tog 4 times, sc16 (20)
Row12: sc around
Row13: sc2tog, sc2, sc2tog, (18)
Row14-17: sc around (4 rounds)
Row18: *2sc in next sc,  sc,* 3 times, sc3,  *2sc in next sc* 3 times, sc3 (24)
Row19-20 sc around (2 rounds)
Row21: sc, sc2tog 3 times, sc17 (21)
Row22: sc2tog, sc, sc2tog, sc8, sc2tog, sc6 (18)
Row23: sc6, sc2tog 3 times, sc6 (15)
Row24: *sc2tog, sc* round (10)
Row25: sc2tog around, fasten off.

Ears (2):
ch2
Row1: sc,hdc,dc,tc,dc,hdc,sc, slst - all into 2nd ch from hook
Row2: sc in first 3 sc, sc, ch sc into next st, sc in last 3 sc. slt st into sl st from previous row, fasten off.

Snout: 

NOTE: I seldom join the rounds, but this time I made an exception. Joined round do not create a visible jog. You can make a spiral snout but I recommend giving it a try.

ch2 (or make a Magic Loop)
Row1: sc6 into 2nd ch from hook (or into Magic Loop), sl st into 1st sc, ch1
Row2: 2sc in next sc around, sl st into 1st sc, ch1
Row3: BLO: sc in each sc, sl st into 1st sc, fasten off.

Sew the snout over the hole that was left in front of your pigs head. Stuff if necessary.

Front Legs (2):
ch2 (or make a Magic Loop)
Row1: sc6 into 2nd ch from hook (or into Magic Loop)
Row2-6: sc around
Row7: sc3, ch1 turn
Row8: sc3, fasten off

NOTE: rows 7&8 are meant to be incomplete.

Back Legs (2):
ch2 (or make a Magic Loop)
Row1: sc6 into 2nd ch from hook (or into Magic Loop)
Row2-6: sc around
Row7: sc, *2sc in next sc* 2 times, sc, ch1 turn
Row8: sc5, fasten off.

Tail:
ch10
2sc in each chain

NOTE: if you don't want your tail to be curly near the basis, just make single sc into last 2 ch or so.

Assemble & embroider as you wish.

Enjoy your teacup pig!

© Copyright for pattern remains with the designer. Intended for personal use only. Not for commercial use.Selling items made from this pattern is not permitted.© Copyright M. Machowska - Escherichia, March 2015


Pdf available on Ravelry: HERE


Why "Stampey"? The pig's owner I mendtioned refferd to her snout as a "stamp". It sounds even better in Polish - "pieczątka" :3

Have a nice afternoon!

Gosia.


Sunday, March 8, 2015

The Annual First Bee Day!

This week started with some bizarre weather. We had a hailstorm on Monday, dreadful snowfall on Tuesday with subsequent horrible traffic jam, two tiny blizzards on Wednesday... That's pretty typical for March, at least in my region. Well maybe except the hailstorm with thunderbolts.

But today... just take a look:


It's the First Bee Day! Every year I look out for the first bee that shows up in my garden. Sometimes it's around 20th March, sometimes even in February. They are never wrong when it comes to predicting spring. Yes, there might be a slight snowfall or colder days, but winter is definitely going away!


I love how they get all covered in pollen. Literally busy as a bee!


When it comes to knitting: I lost my hat for a day (found it on Tuesday) and started working on a lighter beret. It will have a Vault Hunter emblem on it since I enjoy Borderlands 2 co-op with my husband a lot.

I hope you all have a nice, sunny afternoon!
Gosia.

Sunday, March 1, 2015

Cabled Bolster Finale!

It is still missing a cord to pull close the ends. I just got my hands on my long lost knitting dolly. It had a piece of my first work on it. Apparently, back in 2011 I was able to make a neat-looking cord. I guess human procedural memory isn't half as good as it's said to be.
Nevertheless I present to you:

My (almost) finished Cabled Bolster!

Pattern:

MATERIALS: 
approx 150g of Aran weight yarn (240m), in this case Schachenmayr Nomotta Cotton Light
two sets of 5mm circular knitting needles (that is if you want to work on both ends simultaneously.)
cable needle
one bolster cushion - I bought mine in Ikea, but removed the labels and can't remember the name :(

Part I - Centerpiece
This part is knitted flat, back and forth on circular needles. 

NOTE: First and last stitch are edge stitches. I use the technique my Grandma taught me. First stitch is always slipped to the right-hand needle and last is always knitted. Both on right and wrong side.
This creates a neat edge with series of bumps and bars. Like this:


Whatever technique you use,keep in mind that you will be picking up stitches from this edge later on. Just don't make it harder than it is :)

CO34  using provisional cast on (32 sts + 2 edge sts - those will NOT be mentioned in directions)

Row1: *p2, k4* 5 times, p2
Row 2, and every even row: *k2, p4* 5 times, k2
Row 3: *p2, cross2L, p2, k4* 2 times, p2, cross2L, p2
Row 4: repeat Row 2.

Continue until desired length. End with Row 2.
Graft using kitchener stitch or three needle bind off.

Part II - Tubes
this part is worked in round. I am a die-hard fan of magic loop technique, but if you're more comfortable with DPN's do not hesitate to use them.

Pick up the stitches from each edge. You should pick up stitches from beneath bars and bumps mentioned earlier. Number of stitches should be dividable by 4.
I got 100 sts by picking up as follows:
*bar, bump, bar, skip one bump,* four times and than bar, bump, bar, BUMP, and again  *bar, bump,.. and so on.

If your number of stitches is not dividable by 4 - don't worry! Just knit one round and add/take away some until you get it right.

Row 1-8: k2, p2 around
Row 9: k2tog, p2 around
Row 10-17: k1, p2 around
Row 18: k1, p2tog around
Row 19-26: k1, p1 around
Row 27: yo, k2tog, p1, k1 until last 2 sts, p1, k1.
Row 28: k all sts and yo
Row 29: p all sts
Bind off. I recommend using some kind of stretchy bind off. I used Jenny's surprisingly stretchy bind off - here's an article on it on knitty.com

HINT: Every bolster is a bit different, and I hate counting rows and making notes. That's why I used second set of needles and knitted a few rows of each side at a time.

Part III - The Cord
Make a nice cord with any technique you choose. If you don't like making cords you can always buy a fancy one in a store :)
Pull it through the holes made in Row 27.

Enjoy your new cabled bolster! Yaaay!

© Copyright for pattern remains with the designer. Intended for personal use only. Not for commercial use.
Selling items made from this pattern is not permitted.
© Copyright M. Machowska - Escherichia, March 2015

Pdf version on Ravlery HERE

Whew! I'm glad it's done. This yarn is quite pleasant to work with, but it splits from time to time. It drives me crazy when I find a loose thread sticking out from my work 5 rows below...

I finally went home for the weekend, and left grey, gloomy Katowice for few days. And while at home I found... Spring! Look for yourselves!

Crocuses (or is it "croci"?)

Snowdrops (or "Śnieżyczka przebiśnieg" in Polish :)

Of course I had to return for my next week of classes, but I went back with my inner batteries charged. And let's not forget about home-baked bread from my Mom and eggs from genuine country-side hens. Home, sweet home!

Have a nice evening!

Gosia.