Showing posts with label amigurumi. Show all posts

Tuesday, August 16, 2016

Baaaaaaaaa!

I almost missed it! I was so consumed with my last project I just remembered about this year's Yarndale Community Project. Fortunaltely it's not too late to join in yet!


My little sheep is on it's way to Yarndale.
I decided to go with knitted version as I already had some experience with it. My first sheep from Frankie Brow's pattern lives now in a hospital, where I had a part of my internship.


Let's getto some details: for body I used leftovers of Alize Baby Wool (wool/acrylic/bamboo blend) and for the coat the very last remains of Malabrigo Sock. I also added a nice collar to the sweater. In order to easily find my sheep in the giant Yarndale flock I gave it a haircut. Three shorts pieces of Drops Lima, some combing, and sewing... and voila!


Korek wasn't interested in participating so I took the liberty of photographing him in his sleep. Isn't he a cutie? A lazy one, but still!


I had to secure the parcel somehow without using a plastic-padded envelope. After digging through all sorts of materials I found a piece of undyed Crêpe paper. How did it get to my room? No idea. But hey! It came in handy!


Now all I have to do is to keep my fingers crossed for postal service. Have a safe trip, little sheep!

And nice afternoon to you all!
Gosia.


Tuesday, July 12, 2016

Hasiok's new friend.

Hey, look who I found hanging around in my backyard!


Ok, to be honest I found him on Ravelry (where else?). I was lucky enough to join a free KAL for Owen's Opossum. This cutie was designed by my all-time favorite toy designer: Sara Elizabeth Kellner from Rabitt Hole Knits.


I finished knitting my possum in less than 3 days. I used acrylic yarn leftovers from my Purple Cats, and some pretty random scraps. Since I used smaller needles (3mm for magic loop, and 2,5mm dpns) he came out smaller than original.


 I haven't decided how to call him yet, I was thinking Frank - in honor of Fairway Frank from one of  Parks and Recreation episodes.


While outside, Frank tried to make my dog like him. They didn't get along so well.
Sometimes Korek seems just tired of it all:

"Keep your stupid knitting away!!!"

I went back to my attic and look who showed up! Just in time to meet his new pal!

They seem to be enjoying their company, peeking out of my window. I wonder what are those to up to? I just hope it's not related with my yarn stash in any way.


Well I'm definitely up to making a nice milkshake, with red currants! :3
And making some progress on my scarf. The one I'll share with next time.


Have a nice afternoon!
Gosia.

Monday, June 13, 2016

Children's Day!

Who doesn't love Children's Day? Being 26 years old is not a good enough reason not to celebrate it, right?
Over a week ago my and my hubby got invited by my in-laws to their holiday home. Placed in small town, very near to mountains. Weather was surprisingly good, so we even got to do some hiking!


I regretted not taking any of my WIP's with me, so I could do some open air crocheting.
While enjoying the view, that is.


When we took some rest in the evening, my mother-in-law asked if I heard of octopuses (or is it octopi?) for preemies. As soon as I got home I googled a bit and gathered info on The Danish Octo Project. I found also a big Polish group on Facebook, crocheting and distributing octopuses.


All softies must be made of 100% cotton, and stuffed with polyester filling.
Soo... I dug up all skein ends of Alize Bella I could find and started my work. First two projects are staying with me, because I didn't get the tension right, and filling shows through :( I couldn't bring myself to frog them, though.
Here's my collection of finished octopuses/pi:

Two in the middle are the ones staying :)


I also have some unfinished heads, and tomorrow I'm visiting my sister in search of more cotton.
Let's just have one more look at those swirling arms, shall we?


I think I could find time to crochet another one today.
Have a nice afternoon!

Gosia.

Saturday, May 14, 2016

Mysterious Purple-Grey Thing...s

My niece's bitrthay was two days ago so I can safely reveal what I kept in secret since March.
Two chubby, striped kittens!


Some of you may remember my first kitty made from  The Parlor Cat Pattern by Sara Elizabeth Kellner. It was for my youngest niece's first birthday.
Word travels fast, so soon I had an order for "two big cats, four small ones and a set of mice".
Since I really enjoy going to work, and in having a life in general, I had to cut this order short. First one was a good and tried Parlor Cat:


But as I finished and still had a lot of yarn left (Nako Rekor, really nice, soft, a bit fuzzy acrylic) I decided to make a second cat. This time using different pattern from the same collection: 
The Window Cat by Sara Elizabeth Kellner.


At first I was afraid making two row stripes will show the jog on round beginning, but frankly, it turned out better than the first one!
I skipped making legs. I just like it better that way, and I saw many Ravelers do it :)


Yesterday I gave them to my niece. She loved them! Her real cats however... not so much. I hope they won't decide to murder their new flatmates! :)

Now that that's done I can get back to Banana Leaf Shawl. It's going really great, but I'm still not halfway through the skein! I'll take some pics for the next post!


Have a nice afternoon!
Gosia.


Sunday, February 21, 2016

This Frog is no more!

Dreams came true! My hubby talked me into purchasing a pattern I had on my mind since... forever. Also once every few months someone would send me a link to it or post it on my Facebook wall. I guess it was destiny?

<drum_roll>

THIS IS AN EX-FROG!
(pattern is called Biology 101 by Emily Stoneking)


I cannot express how much fun I had knitting this! I used a skein of leftover Drops Lima in forest green (and some pistachio for guts). It gave my frog a rather luxurious feel. 
Since I don't have any felting equipment I had to improvise on my own version of guts. And I am very pleased with this little freeform knitting experience.


Even my mom was so charmed she let me use one of her picture frames (bought, as usual, just in case) and a piece of red felt. I couldn't lay my hands on T-pins, so I used regular ones. 
Now all that's left is to find a place for on my wall:


Next week I have another shot at my state exam. I already passed it, but there's always room for improvement. Please, keep your fingers crossed (unless you are knitting/crocheting)! 

Have a nice afternoon!

Gosia.


Saturday, December 19, 2015

...Star Wars all the way!

Just a quick post today.
We went to see new Star Wars yesterday. My hubby in his All-Terrain Awesome Tank and me holding our very own...

...BB-8!


I made this sweetest of droids almost a month ago. It is improvised from top to bottom and I'm not really planning on releasing the pattern.

Antennas are made from pipe cleaners and I trimmed the fluff excess :)


That's all for today because I'm busy with Christmas preparations. Today I'm making pierogi for my family.

Have a nice afternoon!

and (of course)

May the Force be with you!

Thursday, December 10, 2015

Box-o-Gnomes.

Time goes by so quickly when you have an "adult life"! Work-home-work-home... And just like that first part of my internship just comes to an end! I wanted to give my coworkers a nice goodbye present, which happens to also be a Christmas gift.

Since I needed something to work up quickly I thought of...

A Box-o-Gomes!

As you can see I took time to give each gnome an original outfit and different mustache/beard style.


How to make your own Box-o-Gnomes?
\
You'll need:

  • Yarn: I used Yarnart Etamin (sold in skeins of 30g): red, beige, green and grey - 1 skein of each color should be plenty for at least 12-18 gnomes.
  • Crochet hook: I used a 3mm one, my gnomes are 6cm/2,5inch tall. Use a hook that fits your yarn.
  • Stuffing material: I prefer using polyacrylic filling from pillows.
  • Black acrylic paint/safety eyes/black beads
  • Small scraps of grey felt.
  • ... and a box.

Gauge is not important.
Do not join rounds.
Numbers in brackets () indicate number of stitches after each round.
Abbreviations are in US crochet terms.

sc - single crochet
hdc - half-double crochet
inc - increase = sc2 into next sc
dec - decrease, I strongly recommend using invisible decrease!
BLO - working in back loops only

HAT (with red yarn):
1) sc 6 into magic loop
2) sc 6
3) *inc, sc* around (9)
4-5) sc 9
6) *inc, sc 2* around (12)
7-8) sc 12
9) *inc, sc 2* around (16)
10-11) sc 16


HEAD (beige yarn)
12) sc 16 - back loops only
13) sc 16
14) sc 7, popcorn st* into next sc, sc8
15) sc 16

*popcorn stitch - make 5 hdcs into next stitch, pull hook out, put hook through the first of 5 hdcs and drag the working loop through.

BODY (alternating between green and grey yarn)
16) *inc,sc7* around (18)
17) sc 18
18) *inc, sc2* around (24)
19) sc 24
20) *inc, sc3* around (30)
21-22) sc 30
23) *dec, sc3* around (24)
24) *dec, sc2* around (18)
25) *dec, sc* around (12)
26) *dec* around (6)

Fasten off  and sew remaining hole.


Paint on, embroider or sew on eyes.

Totally professional painter's kit.

Cut out a desired mustache/beard shape from grey felt. Sew on just below the nose.

Hulk Hogan & hipster!

© Copyright M. Machowska - Escherichia,  December 2015 
© Copyright for pattern remains with the designer. Intended for personal use only. Not for commercial use.
Please do not sell items made with this pattern. Unless it's for charity – feel free to do that :)

Pdf available on Ravelry: here.


Have fun creating you own gnome army!
And a nice afternoon!
Gosia.

Wednesday, December 2, 2015

Christmas preparations start... today!

It's December already! Weather resembles early springtime, but you can tell holidays are just around the corner.

Today I promised to help with decorating my workplace for Christmas (isn't paediatrics the best?).
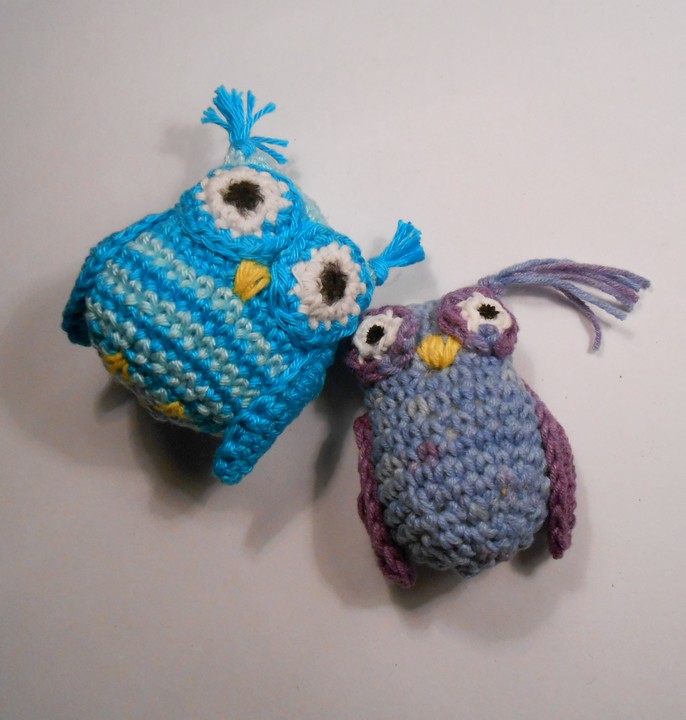
I made one blue owl from pattern by Moji-Moji Design... and I decided it shouldn't be lonely so I made her a little sister based on the same pattern.


Then I wanted to make one of those lovely half-circled birds I saw on Lucy's blog. Being to lazy to check out the exact pattern I decided to improvise. How hard it could be, right?

Well.. instead of an adorable birdie I ended up with a rare specimen known as a Failbird.

What a lovely plumage!

Despite his general quirkiness he seems to get along with my owls very well:


Speaking of preparations for Christmas I decided to clear my conscience.
6 years ago I made I promise I didn't really keep. I was supposed to make a Vault Boy for my classmate. I couldn't find a pattern then and my improvisation skills were far from good.
Last week I started to play Fallout Nev Vegas again and suddenly I remembered!

I found a nice Vault Boy pattern by Bryana Amaro. It's a shame to admit that actually fulfilling my promise took me less than two hours.


But hey, better late than never, right?
I also made some special, VERY SPECIAL preparations for the Star Wars premiere. I'll share them soon!

Have a nice evening!

Gosia

Friday, October 30, 2015

World's Best Dachshund!

Exactly eight years ago we said goodbye to our family dachshund - Dino.


Just let me tell you: he was an exceptional dog! Smart, independent, always hungry and even more independent. Despite being pretty much earthbound, Dino had no problems with getting on a table top and eating WHOLE cup of sugar. Or levitating to get some leftovers:


Some say that dog lovers can be divided into two groups: dachshund fans and others.
That's probably the main reason why dachsie patterns are so popular on Ravelry.
I run into several, but none of them included any chest-shaping and they reminded me of walking sausages :)

This particular plushie was designed for my flatmate, to resemble her neurotic dachshund "Claw".

Dachshund "Claw"


Gauge: is not important.
Size: using 3,25mm hook gave me about 4inch long dachshund
Abbreviations (in US crochet terms):
sc - single crochet
hdc - half-double crochet
dc - double crochet
sl st - slip stitch
ch - chain
Numbers in  brackets () indicate the number of stitches you should have after finishing each round.
DO NOT JOIN ROUNDS!

Body&Tail:  

Rnd1: sc 6 into a Magic Loop, (6)
Rnd2: 2sc in each sc, (12)
Rnd3:  hdc, 2hdc in next 2sc, hdc, sc till end (14)
Rnd4-5: sc even (14)
Rnd6: sc, sc2tog, sc2tog, sc till end (12)
Rnd7-13: work sc  (12)          you can adjust your dog length by adding or subtracting rows
Rnd14: *sc in next 3 sc, 2sc in next sc* repeat 3 times (15)
Rnd15: sc even
Rnd16: *sc in next sc, sc2tog* repeat 5 times (10)
Rnd17: sc even (10) Stuff your toy:)
Rnd18: sc2tog around (5)
Rnd19: fold and sc 2 across remaining sts to close the hole (2)

Tail: 

continue work ch9, slst into every ch. and into sts from Rnd19, fasten off,

Head: 

*Rnd1: sc 6 into a Magic Loop, (6)
Rnd2: *sc in next 2 sc, 2sc in next sc* repeat twice (8)
Rnd3-4: sc even (8) -  if you want a longer snout, add rows here:)
Rnd5: sc and hdc into next sc, hdc and dc into next sc, dc and hdc into next sc, hdc and sc into next sc, sc into last 4 sc (12)
Rnd6-7: sc even (12)
Rnd8: *sc, sc2tog* repeat four times (8)
Stuff now!
Rnd9: sc2tog around (4) Fasten off, sew remaining hole.

Ears - make 2: 

Rnd1: sc4 into Magic Loop
Rnd2: 2sc in each sc (8)
Rnd3: sc even (8)
Rnd4: *sc into next 2 sc, sc2tog* twice (6)
Rnd5: sc even (6) Slst into first st. Fasten off.
Do not stuff, just flatten and sew them on.

Legs - make 4: 

*Rnd1: sc6 into Magic Loop
Rnd2-3: sc even (6) - again length adjustment can be made here:)
Fasten off leaving long tail for sewing.

Sew parts together, make sure that the chest part (shaped with hdcs ind rnd 3 of body) is facing down! Unless you wish to have a hump-backed dachshund:)

If you wish to make a "black-and-tan" version of a dog you should make those rounds with tan yarn. You can also embroider eyebrows, chest-markings and ear edges:) Enjoy!


© Copyright remains with the designer. All rights reserved. Intended for personal use only. Not for commercial use. Selling items made from this pattern is not permitted.
© Copyright M. Machowska - Escherichia, October 2012


PDF for the pattern is available here. Check out other ravelers creations - they are so cute!
I hope you'll enjoy it! 

Have a nice afternoon!

Gosia.

Thursday, September 24, 2015

Parasite plushies #1

Few days ago I got an uncommon request. To be honest, it was the most bizzare request ever.
"Can you crochet a medicinal leech for me?"
I felt flattered! It feels good to be the person to turn to when you need a weird plushie! :)

I got down to designing said leech. I was wondering how to create a nice little sucker... and an old design popped into my head. Let's spend a nice Throwback Thursday, shall we? With a Tapeworm Bookmark!


I never shared it on the blog before. It was a gift for one of my classmates (and friends). He asked for a bookmark. And since we shared a table during our parasitology classes, and worked together on unforgettable drawings depicting countless  tapeworms, pinworms and fleas ... choice was obvious!

Here it is:

Tapeworm Bookmark

Bored? Make yourself a useful toy! Show your kids why should they wash their hands before each meal, and never eat raw meat of unknown origin!

Gauge: is not important.
Abbreviations (in US crochet terms):
sc - single crochet
dc - double crochet
sl st - slip stitch
ch - chain
FLO - front loops only
BLO - back loops only
Numbers in brackets () indicate the number of stitches you should have after finishing each round. If you wish, you can join rounds but it's not necessary (I didn't do it:))


Head (scolex): 
Rnd1: 6sc into Magic Loop
Rnd2: 6 sc in FLO
Rnd3: 2sc in each sc across (12)
Rnd4: sc even in BLO (12)
Rnd5: *sc in next sc, sc2tog* repeat 4 times (8)
Rnd6: sc even (8)
Rnd7: *2 sc in next sc, sc in next sc* 4 times (12) in FLO!
Rnd8: *sc in next sc, 2 sc in next sc* 6 times (18)
Rnds 9-10: sc even (18)
Rnd11: *sc in next sc, sc2tog* 6 times (12)
Rnd12: sc2tog across (6) Stuff head, make sure you do it lightly so the sucker stays concave in the middle!
Rnd13: Fold and sc 3 across remaining st (3)

Suckers (make 4)*: sc 6 into magic loop, sl st into 1st sc. fasten off, sew on sides of head,

*version for ultra-lazy people: sew on 4 buttons:)

Now you will continue work flat. From this point length, shape, anything is entirely up to you. You decide how many segments do you want to make. Here are some general instructions:

Neck:
ch1(counts as sc)  sc 2, turn
ch1,  sc 2, turn
ch1, 2 sc in next sc, sc, turn (4)
ch1, sc, 2 sc in next sc, sc, turn (5)
sc even 3-4 rows

Small segment (I made about 4 of those in the beginning and 3 near end)
ch3 (counts as dc) dc in each sc, turn (5)
ch1, sc in each dc (5)

Big segment:
ch3,  *2dc in next sc, dc* twice (7) turn
ch3, *dc2tog, dc* twice (5)
ch1 sc in each dc

Green - big segment
Red - small segment


"Tail"
Just to be clear: a tapeworm shouldn't narrow towards the end!
But to make it look nicer... just reverse the neck instructions:) and sc2tog in the end to get a nice pointy ending.

Finished!

Feel free to experiment with colours, I would love to see this multicoloured!

© Copyright remains with the designer. All rights reserved. Intended for personal use only. Not for commercial use.  © Copyright M. Machowska - Escherichia, January 2013

PDF available on Ravelry (also in Polish!): here

Crocheting your own tapeworm shouldn't take you more than one afternoon, unless of course you are going for a life-sized Taenia solium... 2 - 3 meters can be more challenging.

Hope you liked it!
Next time I will be sharing with you my cuddly leeches. I'm in the middle of the third draft version.

Have a nice afternoon!

Gosia.