Thursday, January 29, 2015

Taking an evening off.

Yay! Just two exams left to go... I took an evening off today. I got some work done  Finished the main part of Mysterious Pink Thing, as well as playing Mass Effect Trilogy. That last thing made me rather uncheerful for the rest of tonight.

There's also something new going on!
While I was putting my dress back to the wardrobe I stumbled upon a package stored in the corner. I almost forgot about my bolster coushions I purchased in Ikea in October!


I started designing a knitted cover for them. The yarn I used for my Autumn Mess project works up quite nice, but it leaves lots of tiny fibers on clothes when worn. That's why I decided to use what's left of it for my bolsters. I thought about making 2 slanting cables on each bolster. Since I'm ambitious and too proud to look up other people solutions... it may take me some time :)

Can't wait to see how will it turn out!

And speaking of new things: my Bloglovin' profile

Have a lazy evening!

Gosia.

Sunday, January 25, 2015

"When covered in snow, everything looks nice on pictures!"

Since I (still) can't write about my progress on Misterius Pink Thing I want to share some pictures I took today. I went for a long nice winter walk today with my husband. It must have been snowing all night long. Sky is still gray and sunlight seems dim even at midday.


We visited nearby park, which is really more a forest edge with paths and benches. Very cozy-looking benches I must admit:


It's amazing how easily you can forget that you're in the middle of Upper Silesian Industrial Region a home for almost 3mln inhabitans. My neighbourhood is almost surrounded forests and from time to time half-domesticated wild boars give us some trouble. 

Sadly I forgot to take some breadcrumbs for local ducks, so we just stop by and watched them for a couple of minutes. They quacked really loud, and made whistling noises so it's probably their mating season right now. Maybe there weren't hungry after all :)


It's funny how they managed to make paths in ice across whole pond. Like tiny ice breakers!


I finally took a picture of my husband's hat that I made in November. I will have to sit down and work on a pattern soon. 

Have a nice, snowy afternoon! 

Gosia.


Saturday, January 24, 2015

Winter returns - Buka arrives!

It started snowing again today in Katowice. I was just about to start my lovely day with Ob/Gyn book when someting cold and creepy came to my mind...


I don't know if Moomin series was this popular in other countries, but in mid 90's it was an absolute classic in Poland! It aired on Polish National TV (TVP1) at 7pm as a bedtime cartoon. It was the Japanese anime version from 1990-91, you can find wiki article on it here.
There was also a Polish version by Se-Ma-For Studio from 1977-82, with "fuzzy felt" stop motion amimation, but being a 90's kid I didn't have a chance to see in on tv. Wiki article on this one: here.

Being 3 or 4 by the time I was a huge fan of Moomins. I remember waiting for each episode on Friday evenings.
However, there was one thing about the show that would make me tear up and start screaming histerically: Buka/Hufsa/Groke/Mörkö/Mårran - my greatest childhood nemesis.
When I read books several years later it occured to me that Groke was indeed a tragic character. Feared, misunterstood and therefore lonley she travelled around Moominvalley rejected by society.
Back when I was 4 it seemed much simpler though:

She. Was. Pure. Evil.

Still can't look at this and remain 100% calm. 

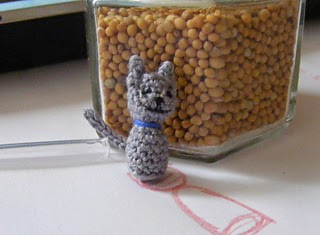
In November 2012 I managed to overcome my fears and designed a small amigurumi Groke.
It's currently my third most popular design, with astounding 8 projects!

When I looked at them on Ravelry I found that two were made by LouiseAnita. I learned from project description (ravelers can see it here, it's in Polish) that the small one is actually a Travel Bug in Geocaching game! It makes me so proud! I located it in on Geocaching site and I keep track of it's journey. It traveled over 1900 miles around Norway and now it got stuck for a while in Sweden.

Feels like you need a Groke of your own? There you go:

The Groke alias Buka alias Mörkö aka Marran

Gauge: is not importaint.
Size: using 3mm hook resulted in Groke that's about 2,75 inches in diameter
Abbreviations (in US crochet terms):
sc - single crochet
hdc - half-double crochet
picot - slip stitch, 3ch, sl st in the same st
ch – chain
dec – decrease by one sc (sc2tog)
Numbers in brackets () indicate the number of stitches you should have after finishing
each round.
DO NOT JOIN ROUNDS!


Head&Body:
Rnd1: sc 6 into a Magic Loop, (6)
Rnd2: 2sc in each sc, (12)
Rnd3: *2sc in next sc, sc* repeat 6 times (18)
Rnd4-6: sc even (18)
Rnd7: * 2sc in next sc, sc2* repeat 6 times (24)
Rnd8: sc in next 6sc, *2sc in next sc, sc 2* 6 times (30)
Rnd9: sc in next 6sc, *sc 3, 2sc in next sc* 6 times (36)
Rnd10: sc in next 6sc, *2sc in next sc, sc 4* 6 times (42)
Rnd11-12: sc even (42)
Rnd13: sc 8, skip next 6sc (sc in 7th sc), sc evenly until you have only 8 sc left, skip 6, sc 2. (30)
Rnd14: *2sc in next sc, sc4* 6 times (36)
Rnd15-16: sc even (36)
Rnd17: *2sc in next sc, sc 5* 6 times (42)
Rnd18: sc evenly (42)
Rnd19: FRONT LOOPS ONLY: *sc, 3hdc in one sc, sc* 14 times (70? I'm not really sure...)
Rnd20: in BACK LOOPS of 18th round: sc even (42)
Rnd21: *dec, sc 5* around (36)
Rnd22: *dec, sc 4* around (30)
Rnd23: *dec,sc 3* around (24)
Rnd24: *dec, sc2* around (18)
Rnd25: *dec, sc* around (12)
Stuff you toy!
Rnd26-27: *dec* around (6) (3)
Fasten off, sew remaining hole.

Arms:
Attach yarn to the hole that was made by skipping 6 sc in Rnd13, stuff as you go:)
Rnd1-3: sc even (6)
Change to dark purple
Rnd4: sc even
Rnd5: picot 3 times, sl st in last 3 sc.
Fasten off
I had to keep the arms in position by sewing them to Groke's belly after I finished work, just some
slight cheating :)

Nose:
With darker yarn:
Rnd1: sc 4 into a Magic Loop, (4)
Rnd2: *2sc in next sc, sc* repeat twice, (6)
Rnd3: *2sc in next sc, sc 2* twice (8)
Rnd4: *2sc in next sc, sc 3* twice (10)
Rnd5: *2sc in next sc, sc 4* twice (12)
Rnd6: sc 6, * 2sc in next sc, sc* 3 times (15)
Rnd7: sc 6, sc 9 back loops only (15)
Rnd8: *dec, sc* 3 times, 2 dec, sc, 2 dec (10)
Stuff lightly
Rnd9: dec around (5)

Fasten off, sew the remaining hole, leaving long time for sewing.Attach nose to the Groke, embroider eyes and teeth.
Adjust arms position if required.
Congratulations! You are now ready to scare you kids for life!
Enjoy!

© Copyright for The Groke and Moomins belongs to Tove Jansson . I do not claim any rights to the character.
© Copyright for pattern remains with the designer. Intended for personal use only.
Not for commercial use.
Selling items made from this pattern is not permitted.
© Copyright M. Machowska- Escherichia, October 2012


Pdf is available on Ravelry, check out other projects! They're so cool!
It's never too late to face your childhood fears :)

Have a nice afternoon!

Gosia.

Thursday, January 22, 2015

Prolonged Blue Monday Syndrome.

You've probalby heard about Blue Monday? It's the saddest day of whole year due to psychological, meteorological and financial reasons. I seems my Blue Monday turned into Blue Week or even Blue January. Spring turned back to short, dark, cloudy and wet days. My pile of undone work seems to grow rapidly... I still have to take 2 major exams and some minor assesments, and I  have already run out of most of my enthusiasm and vigor.

For now I take comfort only in knitting my second biggest toy project.

Throwback Thursday fact:
The biggest toy so far, and also the first complete kintted item I ever made was Hindenburg the Pig completed in February 2005 (or 2006). I just now realised it's 10 years old! He was a lucky charm  for my class during our exam in junior high in 2006. My classmates called him Bacon :)


My sister got me a copy of a pattern. I cannot find the name of the book it was published in. There's just too many pig patterns out there. It was a simple garter stitch desing, with increases and derceases on sides only and therefore it was perfect for me as a begginer. I ran out of yarn 4-5 cm before the end and had to finish it with another shade of pink. This is when I learned that filling is very VERY importaint when it comes to toys. I stuffed it with sponge recycled from an old coushion. That's why it's surface is bumpy - sponge was cut into small pieces. And that's also why it smelled funny. Just last year I ripped it open, had it washed and filled it with fiber-fill from... another coushion. Shortly after his "rebirth" Hindenburg was adopted by my niece.

Hindenburg aka Bacon in all his piggy glory!


Aaanway. Back to my Mysterious Pink Thing. It's going really good, I finished the worst part which (at least for me) is embroidery work, and partially stuffed it. I must keep it secret for two more weeks though. Ruining birthday surprises is uncool!
Here's antoher sneek peek, this time with my beloved Pony Wool Needles! I hate sewing and embroidering, but those needles make it a lot less painful :)


Untill next time!
Have a nice evening!

Gosia.

Saturday, January 17, 2015

"Can't tell" Project!

I got back home for weekend and discovered this in my garden:


This year's winter just got weirder!

I started working on a new project, I already know it will be one of my favourites. I will keep it a secret though, at least for now.
Here's a sneek peek:


It's a Polish yarn "Czterdziestka" ("Forty"), you can find in Ravelry database: here. 

Well, back to work. My exams are consuming most of my time now. Just a bit more than 3 weeks left untill end of my term! Oh, and I will need to reward myself with some yarn after that :3

Have a nice weekend!

Gosia.

Wednesday, January 14, 2015

Autumn Mess & Springtime in Winter

Springtime! 6°C in the evening and lovely sunny days!
Even local chickadees started avoiding my balcony. Nevertheless I managed to take a picture of one of them checking out my Pinterest-inspired bird feeders.


Since we already have seasons all mixed up... why not go back to Autumn?
Lovely warm evenings in my attic, with a cup of hot coffee.


I present to you:
My favourite knitted pullover so far!*


*it's my third pullover, so I'm not really that far...


Autumn Mess

Make sure to read ENTIRE pattern before you start.

I used the percentage method, but you can also check out an online pattern generator, like this one.
I strongly recommend making your own swatch and adjusting numbers :)

GAUGE: My gauge was approx 12sts x 20rows for 10x10cm(4x4inch) square in stockinette stitch with 7mm needles, but I'm not good with swatches, so you probably shouldn't trust me.


I PATTERN

Body:
Cast on 60 st on smaller needles (5mm)
Rows 1-5: knit
Change to bigger needles (7mm) & set up markers:
Row 6: k10 PM k20 PM k10 PM k20 (sleeve, front, sleeve, back)
Rows 7-46: increases!

Increases will be made on even rows only by increasing one stitch on each side of every marker. This will give you additional 8 stitches. I prefer kfb increase (knit thorugh back&front loop of the stitch next to marker), but any increasing method will do.
Continue until you have made 20 increases (46 rows). You should now have 220sts in total divided as follows: 50-60-50-60
Neckline with first couple of increases

Row 47: Remove markers as you go. Set 50sts aside to a piece of yarn, knit next 60st, place next 50 sts on a piece of yarn, cast on 8 sts, knit 60, cast on 8 sts, join. (136sts)

Continue work. You can either work the sweater straight, or do some waist shaping.

When you reach desired length make at least 5-6 rows of seed stitch to prevent fabric from rolling up and bind off.

Edgeing - 5 seed stitch rows

Sleeves:
knit 50 sts from scrap yarn, pick 4 sts from body, PM, pick 4 sts, close circle
decrease every even row on both sides of marker (I used k2tog and ssk here to make decreases lean neatly towards the marker) – the more times you decrease the slimer your sleeve will be. I did 7 decreases in total, so my sleeves are 44sts each.

End your sleeves with seed stitch band, at least 5-6 rows long. Mine has 14 rows. Bind off.


Weave ends in, You're done!

II BEADS


I used wooden 8mm beads with 2mm hole. Make sure your beads are good quality! Cheap ones often have multiple, tiny splinters inside that might drive you crazy. Also, look for varnished beads since you will one day need to wash your pullover.

Not into wooden marbles? Try something else, but remember they shouldn't be too heavy.
You can also arrange your own pattern.


Mine starts in increases section and goes all the way to bottom across the chest.
It took 130 beads. I placed them with 1.3mm hook. Took me some time to learn how to catch aran yarn with hook this small but it was worth it!
I never placed beads on adjacent stitches so they wouldn't stretch the fabric too much.

Enjoy!

© Copyright for pattern remains with the designer. Intended for personal use only.
Not for commercial use.
Selling items made from this pattern is not permitted.

© Copyright M. Machowska - Escherichia, November 2014

PDF version, as usual, available on Ravelry- here.

Have a nice evening!

Gosia.

Monday, January 12, 2015

Mad Spaniel and Grand Facebook Page Opening!

Yay! I finally got some free time and finished setting up my Facebook page. Now I can spam my poor, poor friends more effectively!

Anyway, back to my designs: this pattern was created in October 2012.
It is not a very good one I'm afriad but still I have a fondness for it. The pattern was inspired by my crazy cocker spaniel. His name is Korek (which can be translated as "Bung") and he is the most adorable and yet vicious creature in this part of the Galaxy.
I present to you... my dog:


And his mini-version:


I'm not sure why, but he loves eating my Amigurumi work. He chewed up quite a few toys including this one. That's almost a cannibalism!


Mad Spaniel

It is supposed to be a sitting dog, therefore back legs are made for decorative purposes only:)

Gauge: is not importaint.
Abbreviations (in US crochet terms):
sc - single crochet
hdc - half-double crochet
dc - double crochet
sl st - slip stitch
ch - chain
Numbers in brackets () indicate the number of stitches you should have after finishing
each round.
DO NOT JOIN ROUNDS!

Body:
Rnd1: sc 6 into a Magic Loop, (6)
Rnd2: *sc in next sc, 2 sc in next sc* 3 times, (9)
Rnd3-4: sc even (9)
Rnd5: *sc in next 2 sc, 2sc in next sc* 3 times (12)
Rnd6-7 sc even(12)
Rnd8: *sc in next 3 sc, 2 sc in next sc* 3 times (15)
Rnd9: *sc in next 2 sc, 2 sc in next sc* 5 times (20)
Rnd10: 2 sc in next sc - 5 times, 5 sc, 2 sc in next sc, 3 sc, 2 sc in next sc, 5 sc (27)
[5 increases mark the back of your dog]
Rnd11-13: sc even (27)
Rnd14: * sc in next 7 sc, sc2tog* 3 times (24)
Rnd15: *sc in next 2 sc, sc2tog* 6 times (18)
Stuff your toy:)
Rnd16: *sc in next sc, sc2tog* repeat 6 times (12)
Rnd17: sc2tog around (6)

Tail:
Rnd1: sc 3 into magic loop
Rnd2: sc 3, 2sc in next sc (4)
Sc even till tail has desired length
sc4, 2sc in next sc (5)
Make a frill: *ch2, sl st into edge of tali* repeat to end of tail.


Head:
*Rnd1: sc 6 into a Magic Loop, (6)
Rnd2: *sc in next 2 sc, 2sc in next sc* repeat twice (8)
Rnd3: sc in next 4 sc, 2 hdc in next sc, sc in next 3sc, 2hdc in next sc (10)
Rnd4: sc in next 4 sc, hdc, 2hdc in next st, sc in next 2 sc, 2 hdc in next st, hdc in next st (12)
Rnd5: sc even (12)
Rnd6: sc in next 4sc, sc2tog, sc in next 4 sc, sc2tog (10)
Rnd7: sc even (10)
Rnd8: sc and hdc into next sc, hdc and dc into next sc, dc and hdc into next sc, hdc and sc
into next sc, sc into last 6 sc (14)
Stuff now!
Rnd9: *sc2tog, sc in next sc* 4 times, sc in next sc (9)
Rnd10: *sc2tog* 3 times (6)
Fasten off, sew remaining hole.

Ears - make 2:
Rnd1: sc4 into Magick Loop
Rnd2: 2sc in each sc (8)
Rnd3-5: sc even (8)
Rnd6: *sc in next 2 sc, sc2tog* 2 times (6)
Slst into first st. Fasten off. Do not stuff, just flatten and sew them on.

Front legs - make 2:
Rnd1: sc8 into Magic Loop
Rnd2: sc 8 in back loops only (8)
Rnd3: *sc in next 2 sc, sc2tog* 2 times (6)
Rnd4-7: sc even (6)
Fasten off leaving long tail for sewing.

Back legs - make 2:
Make rounds 1-5 like for front legs

Fasten off leaving long tail for sewing.
Sew parts together, make sure that back part is in the back:)
Enjoy!


© Copyright remains with the
designer. All rights reserved. Intended for personal use only. Not for commercial use. Selling items made from this pattern is not permitted.
© Copyright M. Machowska - Escherichia, October 2012

PDF version is available as a Ravelry download here.

Untill next time!

Gosia.

Saturday, January 10, 2015

Bead Crochet Ropes

It's such a sleepy morning... I found one of my bracelets while trying to organize my working space for today's upcoming struggle with paediatrics. And this reminded me of...

Bead crochet ropes!
Started making these last October. Followed tutorial from this blog (lots of lovely, lovely work there!). It's quite annoying for me, because I don't like wearing jewelery but crocheting it gives ma a lot of satsisfaction and fun.

I really like how easy it is to make your own desings, I use free version of DB-Bead program along with good old MS Paint to save my results. Here are some of my creations:

Both are made from TOHO beads size 11/0 (Opaque: Pepper Red, Curry, Rainbow White, Turquoise, Jet, Milky: Kiwi). As a begginer I ordered wrong size of silver assembly rings and they are so small I have problems with attaching them to anything :(

And here are DB-Bead charts:


Back to work I guess...

EDIT: Hasiok says "hello!"


Have a nice day!

Gosia.

Friday, January 9, 2015

Unfinished Buisness - the Walk of Shame.

Every knitter/crocheter knows this, right? I can't be the only one to have a stockpile of WIPs.
My Ravelry notebook doesn't show it that much, because I usually delete unfinished items to clear my conscience.

Let's take a walk of shame, shall we:

  • Crocheted cardigan - it was supposed to be my first serious project. I bought a magazine for crocheters, I even got a package of YarnArt Jeans for my birthday... an failed to go beyond the first half of first sleeve.

  • African flower bolster - I ran out of patience after 15th hexagon, It's not my fault that no one produces bolsters that small! Really!

  • Wedding stole - my first attempt on lace knitting, I abandoned the project whem I changed my dress idea. No regrets here, my wedding day was way to hot and sunny for alpaca.

  • Big woolish something - I found a big package of "natural" wool. Apparently not all yarn producents are honest people. Did you know that "pure wool" melts when set on fire?
  • My great desing - I wanted to make  a cool shrug. I ended up with ball of yarn I cannot untangle. How and when did that happen since I do not own a cat? No ideas...

  •  Rosina - getting stuck after first sleeve is a curse of mine, I also was pretty disappointed in the edging, and vision of frogging the entire bottom made me lose my enthusiasm completely.


  • What was that supposed to be I don't even recall...


That's not all of course. There's my green shawl. big green sweater, some unfinished Gojira desing...
Oh, and there's an exam I should be studying for right now, but I can't focus on one topic, and try to read them all at once... I hope it will not end up as my WIP forever :)

Have a nice day everyone*!

Gosia


*as far as I know "everyone" right now refers to my sister, and  husband - thank you! :P

Thursday, January 8, 2015

Micron the Kitty - big journeys begin with small steps.

Let's start with something small.

I designed Micron in April 2013. I made four of them, gave one to my friend... and lost the others. Maybe I'm not meant to make microamigurumi. 


First version of Micron Kitty


Micron the Kitty

Gauge: is not important.
Size: using 1,1mm hook gave me about 1,5cm tall cat.
Abbreviations (in US crochet terms):
sc - single crochet
hdc - half-double crochet
dc - double crochet
sl st - slip stitch
ch - chain
blo - back loop only
sc2tog - 2 single crochets crocheted together (if you find it hard to make it the
proper way.. just skip one sc, no one has to know, right?)
Materials: I used three strands of 6-strand embroidery floss, you'll also
need mustard seeds or other filling and some acrylic paint or mad embroidery skills :)

DO NOT JOIN ROUNDS!

BODY&HEAD:
Rnd1: sc6 into Magic Ring
Rnd2: 2sc into each sc across (12)
Rnd3: sc in blo of each sc
Rnd4-7: sc in each sc (12)
Star stuffing, I used mustard seeds, because it gives this tiny creature a nice
weight :)
Rnd8: [sc in next sc, sc2tog] 4 times (8)
Rnd9 sc in each sc (8)
Rnd10: 2sc into each sc across (16)
Rnd11: sc in each sc (16)
Rnd12: [sc in next 2sc, sc2tog] 4 times (12)
Rnd13: sc in each sc (12)
Rnd14: TRICKY one!: sl st in next sc, ch1 [sc, hdc, ch2, sl st into 1st ch, ch2,
sl st] into next sc, sc in next 2sc, ch3, sl st into 2nd ch, [hdc, sc] into next sc,
sl st into next sc, [sc, sc2tog] 2 times
By this point you should have 4 scs in front of head, and two ears with 2scs
between them.
Rnd16: sc into each of 2sc between ears, sc into each of 4 other scs (6)
Rnd17: sc in each sc (6)
Bind off sew the hole, and holes that are near ears.

TAIL:
ch11, sl st into each ch, starting with 2nd one from hook. Attach:)
I painted eyes and face with acrylic paint and a pin. Also added a collar.

© Copyright remains with the
designer. All rights reserved. Intended for personal use only. Not for commercial use. Selling items
made
from this pattern is not permitted.
© Copyright M. Machowska - Escherichia, April 2013


You can find pattern on Ravelry:
Micron the Kitty (there was supposed to be a ball of yarn gif here, but I cannot make it happen :/)

Have a nice afternoon!

Gosia


Who's Hasiok?

I never made any New Years resolutions, but this year I made an exception!
Starting a blog about my hobby is my idea for being lazy and productive in the same time. It's also a way to keep my English writing skills on a decent level, since I already finished this part of my education.

I will start with sharing some of my own designs, and keeping track of my current WIPs.

Oh, and meet Hasiok:

He is my pet plush rat I bought just before Christmas. "Hasiok" means "dumpster" and he was named to honour a rodent who lives in a trashcan besides my flat. My husband never believed I saw a rat there, so I purchased this one to show him how does a rat look like.
Now Hasiok is an official blog mascot! What an advancement!

I look forward to this blogging adventure of mine.
(I should get a catchphrase)

Gosia.